

Travel information checked on 29 October 2026. If you are heading to Club Med Bali, Club Med Bintan or another Indonesian destination, prepare your All Indonesia Arrival Card using your actual arrival details. This guide covers flights and ferries, the official timing and what to keep ready for arrival.
What the All Indonesia Arrival Card covers
All Indonesia combines immigration, customs, health and quarantine declarations for international arrivals. It is used by foreign visitors and Indonesian citizens returning from abroad. The nationwide airport and seaport rollout took effect on 1 October 2025; it is no longer an upcoming change.
For arrivals by air or sea, use the integrated All Indonesia service. Indonesian Customs explains the current air-and-sea process separately from the customs process for land arrivals. Follow the official instructions for your actual entry point rather than assuming every border crossing uses the same procedure.
When and where to complete it
The official All Indonesia FAQ says the declaration can be completed from three days before arrival (D-3) through the day of arrival. Work from the date you enter Indonesia, not your flight or ferry departure date. Completing it before boarding is recommended so that you are not trying to finish the form during arrival checks.
Use the official All Indonesia website on your phone or computer, or the official app on Google Play or the App Store. The declaration is free. Visa fees, where applicable, are separate; do not mistake a paid third-party submission service for a government requirement.
The Ministry of Tourism guide also confirms the arrival-based timing and official website. Follow the dates accepted by the current service if your itinerary changes.
Have these details ready
- The passport each traveller will use, plus a working email address and contact number.
- Your Indonesian arrival and departure dates, flight or ferry details and entry airport or port.
- Your accommodation name and address, copied from the booking confirmation.
- Your visa or residence-permit details, if you hold one.
- Information needed for the current health, customs and quarantine questions, including your travel history and goods carried.
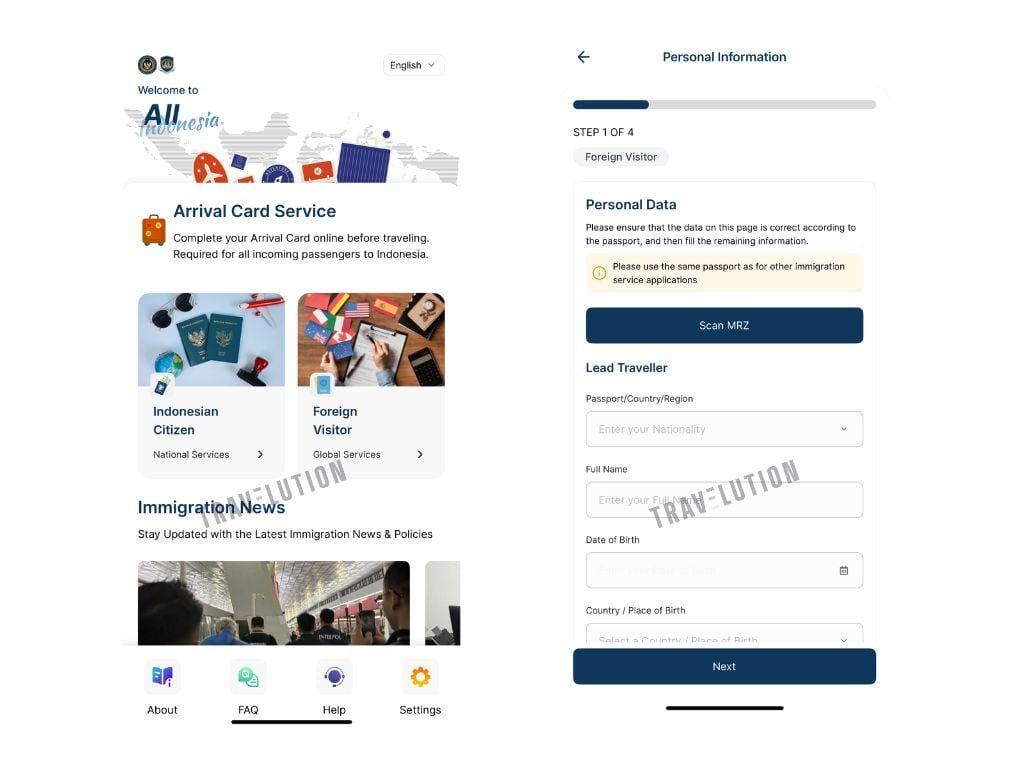
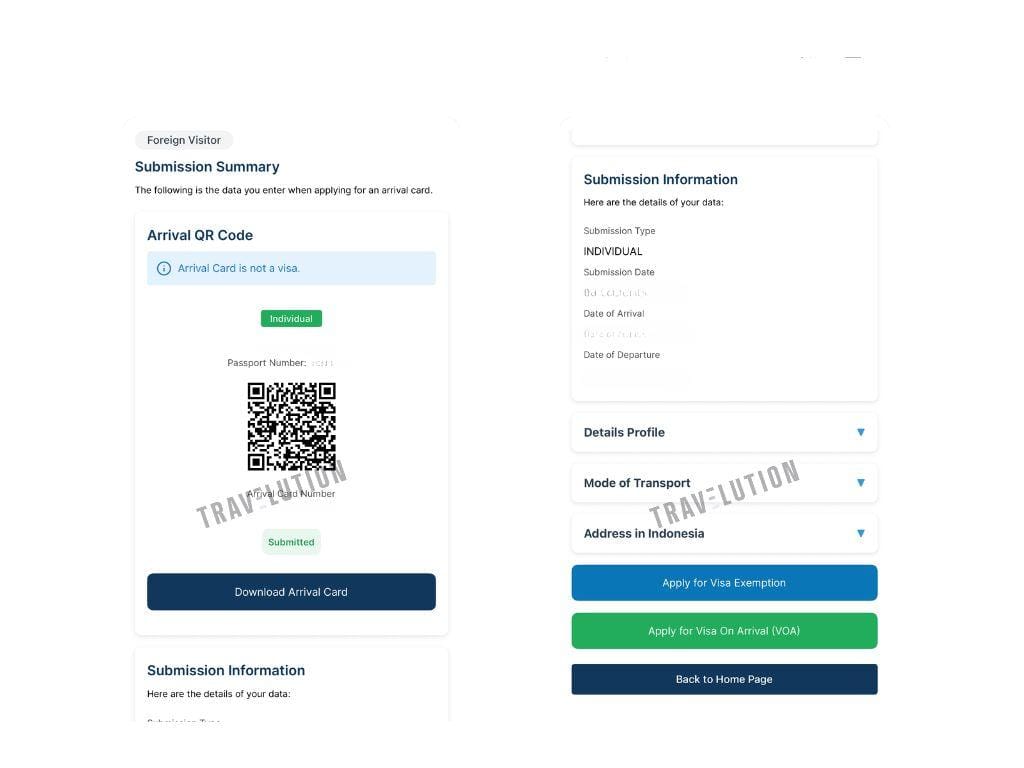
About the screenshots: The four images below are retained from our original 2025 walkthrough. They illustrate the process, but are not a claim that the current app looks identical. Field labels, order and questions can change; follow the live form and your own documents.
Step 1: Open the service and check personal details
Choose the category that matches you, such as Foreign Visitor for a foreign national or the Indonesian-citizen option for an Indonesian traveller. If the form offers passport scanning or “Scan MRZ”, use it if helpful, then check every populated field against the passport. Correct missing or misread information before continuing.
If you use a family or group submission, check the details for each person included. Do not assume that entering the lead traveller automatically covers everyone in the booking.
Step 2: Enter the correct journey and accommodation
Enter your actual arrival and departure dates. Answer any visa or KITAS/KITAP question according to the documents you hold; do not copy a default “No” from an example. Select the purpose that matches your trip. For an ordinary holiday, use the holiday or leisure option shown by the form.
- Flying to Bali: select air travel and your actual entry airport. For a direct international arrival at Ngurah Rai, choose the airport entry corresponding to DPS / I Gusti Ngurah Rai and enter the airline and flight number from your ticket.
- Taking a ferry to Bintan: select sea travel and ferry where offered. Use the arrival port on your ferry booking, such as Bandar Bentan Telani for a sailing to that terminal, and the vessel or sailing details requested. Do not copy the Bali airport example.
- Connecting elsewhere in Indonesia: use the international entry point where you first arrive, not simply the airport nearest your final hotel.
- Accommodation: enter the property and address from your confirmation. Choose the matching location in the current dropdown rather than copying an unrelated sample city.

Step 3: Complete the declarations accurately
Answer the health, customs and quarantine sections using your own circumstances. Read the reporting period shown for travel history and the current questions about symptoms, baggage and goods. The older screenshot is not a reason to ignore a new question or reporting period.
Review the official guidance before travelling if you carry food, plants, animals or animal products, medication, specialist equipment or other items that may need a declaration or permission. If you are unsure at arrival, ask the relevant officer rather than selecting “No” simply to continue.

Step 4: Review, submit and keep the QR code
Before submitting, check names, passport numbers, arrival date, transport, accommodation and the answers for every traveller. Save the completed declaration QR code on your phone so you can retrieve it without mobile data; a printed backup can also be useful. Keep it with your passport and travel documents for the checks at your arrival terminal.
If the service offers a link to apply for visa exemption or a visa, only use the route for which your nationality, passport and trip are eligible. A declaration QR code is not proof of an approved visa or completed visa-exemption registration.
Visa rules and autogates are separate checks
Check your eligibility and required documents through the official Indonesian eVisa portal before travel. Do not buy a visa simply because a screenshot displays a payment option, or assume that every ASEAN traveller and every purpose of visit uses identical conditions.
Autogate use also depends on the applicable passport, immigration-record and other eligibility requirements. The All Indonesia QR code alone does not guarantee access or admission. Read our Bali autogate guide and follow immigration staff directions if a staffed counter is needed.
Plan the rest of your arrival
For airport meeting points, transfers and resort check-in, continue with the Club Med Bali arrival guide. Ferry passengers should use the Club Med Bintan arrival guide, including the separate Singapore arrival requirements when travelling through Singapore.
Keep your transfer confirmation and local contact number available, allow time for all arrival checks, and tell Travelution if your travel arrangements change. Completing the declaration in advance helps you arrive prepared, but it does not remove immigration, baggage, customs or quarantine checks.